WordPress is the best CMS. We all know this because with its help we can create blogs and websites which we can customize to any extent.
Another great thing about WordPress is that it is very easy to use and you can learn to use it well by working with it for just a few hours. Apart from this, you will find millions of tutorials about WordPress all over the internet, which will help you a lot.
Read More: How to fix “Error Establishing A Database Connection” in WordPress?
We have already shared many tutorials about WordPress with you on our blog so that you can understand every aspect of WordPress and be able to create a great blog or website.
One thing that takes time to learn with WordPress is Search Engine Optimization. This is because one can learn SEO well only if they implement it themselves.
In this article, I will talk about an important SEO aspect of WordPress and show you how you can change your permalink structure in WordPress without losing your traffic.
Why and how to change WordPress permalinks?
This post will help you understand which permalink structure is the best and SEO-friendly. Now if you have created a new blog, and you have changed the permalink structure as soon as you created the new blog, then you are on the right track.
However many new bloggers do not change the permalink structure while creating their new blog. Many of them keep the default permalink and later realize that they will have to change the permalink structure.
Now when you change the permalinks after publishing some blog posts on your blog, there is a chance that your blog will get broken. By broken here I mean that many pages will start showing errors and you will lose link juice.
In this guide, I will share with you how you can change your permalinks without harming your traffic and link juice.
So for now let me assume that you have a blog with some blog posts published, and now you are trying to change the permalinks.
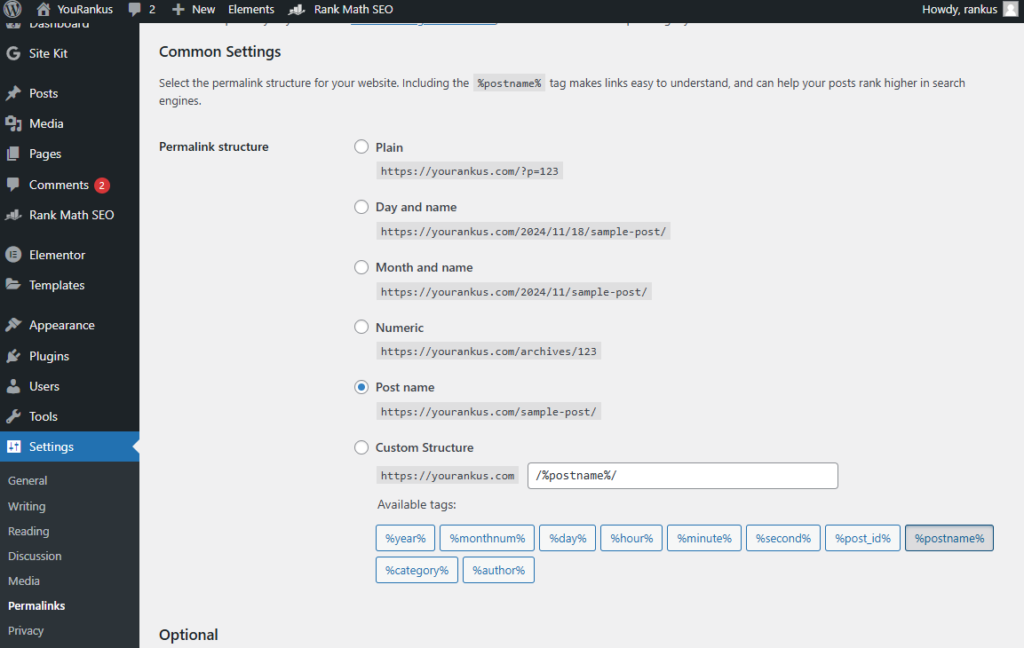
In most cases, WordPress handles the redirection automatically and you don’t have to worry about anything. All you need to do is go to Settings > Permalinks and choose the permalink structure you want to have. I always recommend using the /%postname% permalink structure, as we mentioned in the above article.

Once you change the permalinks, open any of your old permalinks and then check whether it is redirecting you to your corresponding new permalink or not. If yes, then congratulations you don’t need to do anything now, if not then keep reading further.
What happens many times is that old permalinks start showing a 404 error. In such cases, you have to check your .htaccess file. You have to change the permission of your .htaccess file to 777 and then repeat the process mentioned above.
This should solve your problem. When you change the Day and Name permalink to %postname% permalink, you can use this code of the .htaccess file along with the default .htaccess code of WordPress. Also, make sure that your .htaccess file also contains the following lines.
# BEGIN WordPress

RewriteEngine On

RewriteBase /

RewriteRule ^index\.php$ – [L]

RewriteCond %{REQUEST_FILENAME} !-f

RewriteCond %{REQUEST_FILENAME} !-d

RewriteRule . /index.php [L]

# END WordPress
If you have already internally linked your blog posts, you can install this plugin called broken link checker plugin and use its redirection module to quickly update old URLs to new ones. If you are familiar with WordPress, you will not face any problems in following this method. If you are not familiar, you can let me know through comments and I can do it for you.


